Introduction #
The measurements from the PELab / PEController can be monitored, recorded and analyzed using the intelliSENS software. This article explains the procedure for connecting the controller with intelliSENS.
PEControllerBSP Configuration #
The board support package for PEController provides the configuration for enabling intelliSENS monitoring. The settings for intelliSENS integration are available in the user_config.h file in Common/Inc. Set ENABLE_INTELLISENS to 1 to enable intelliSENS.

The sampling rate of the measurement module controls the monitoring speed for intelliSENS. SAMPLING_TIME_US defines the user specified sampling time in micro-seconds. e.g. if SAMPLING_TIME_US = 10 the measurement speed will be 100kHz. Currently the maximum supported sampling rate for intelliSENS integration is 100KHz. This rate may decrease if other operations are added in Cortex-M4 core.
Make sure that the run configurations for your Cortex-M7 project enables loading of Cortex-M7, Cortex-M4 and intelliSENS executables as shown in the image below:

Program the PEController with these settings before moving on to the next section.
intelliSENS Analysis #
intelliSENS Analysis provides the data acquisition capability for all intelliSENS devices. It can be used for monitoring, recording, spectrum and harmonic analysis as well as power quality analysis. Make sure to follow the procedure given in PEControllerBSP Configuration before this section.
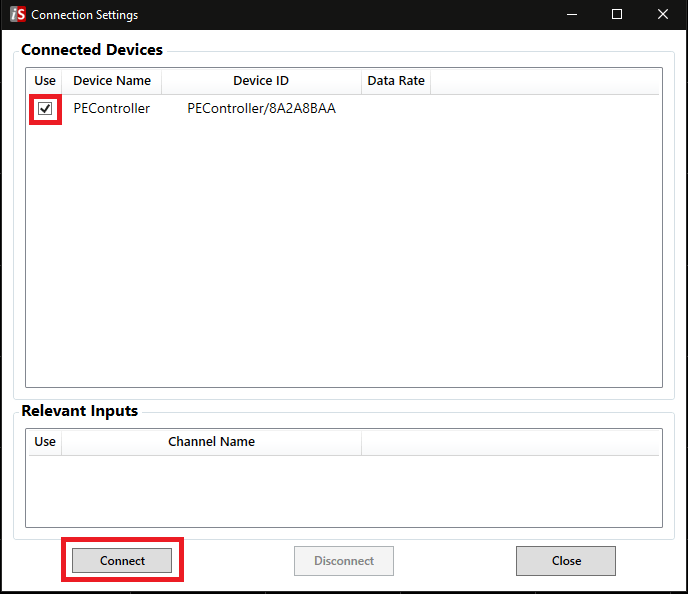
Step 1: Connect the PEController’s USB-OTG connector to the PC via a USB cable.
Step 2: Open the intelliSENS Analysis software.
Step 3: In the Connection Settings window select the PEController / PELAB and then press Connect.
Step 4: There are three tabs in the main window. The Scope tabs displays the analog signal waveforms and there measurements, the harmonic analysis tab displays the harmonics information whereas the power analysis tab computes the power quality analysis.
Step 5: Go to the Scope tab and configure the names for channels to be used. Also configure the sensitivities for the channels in the sensitivities column.

Step 6: Select all channels by holding shift and then pressing first and last channel. Select the DC coupling to remove any post processing of data.
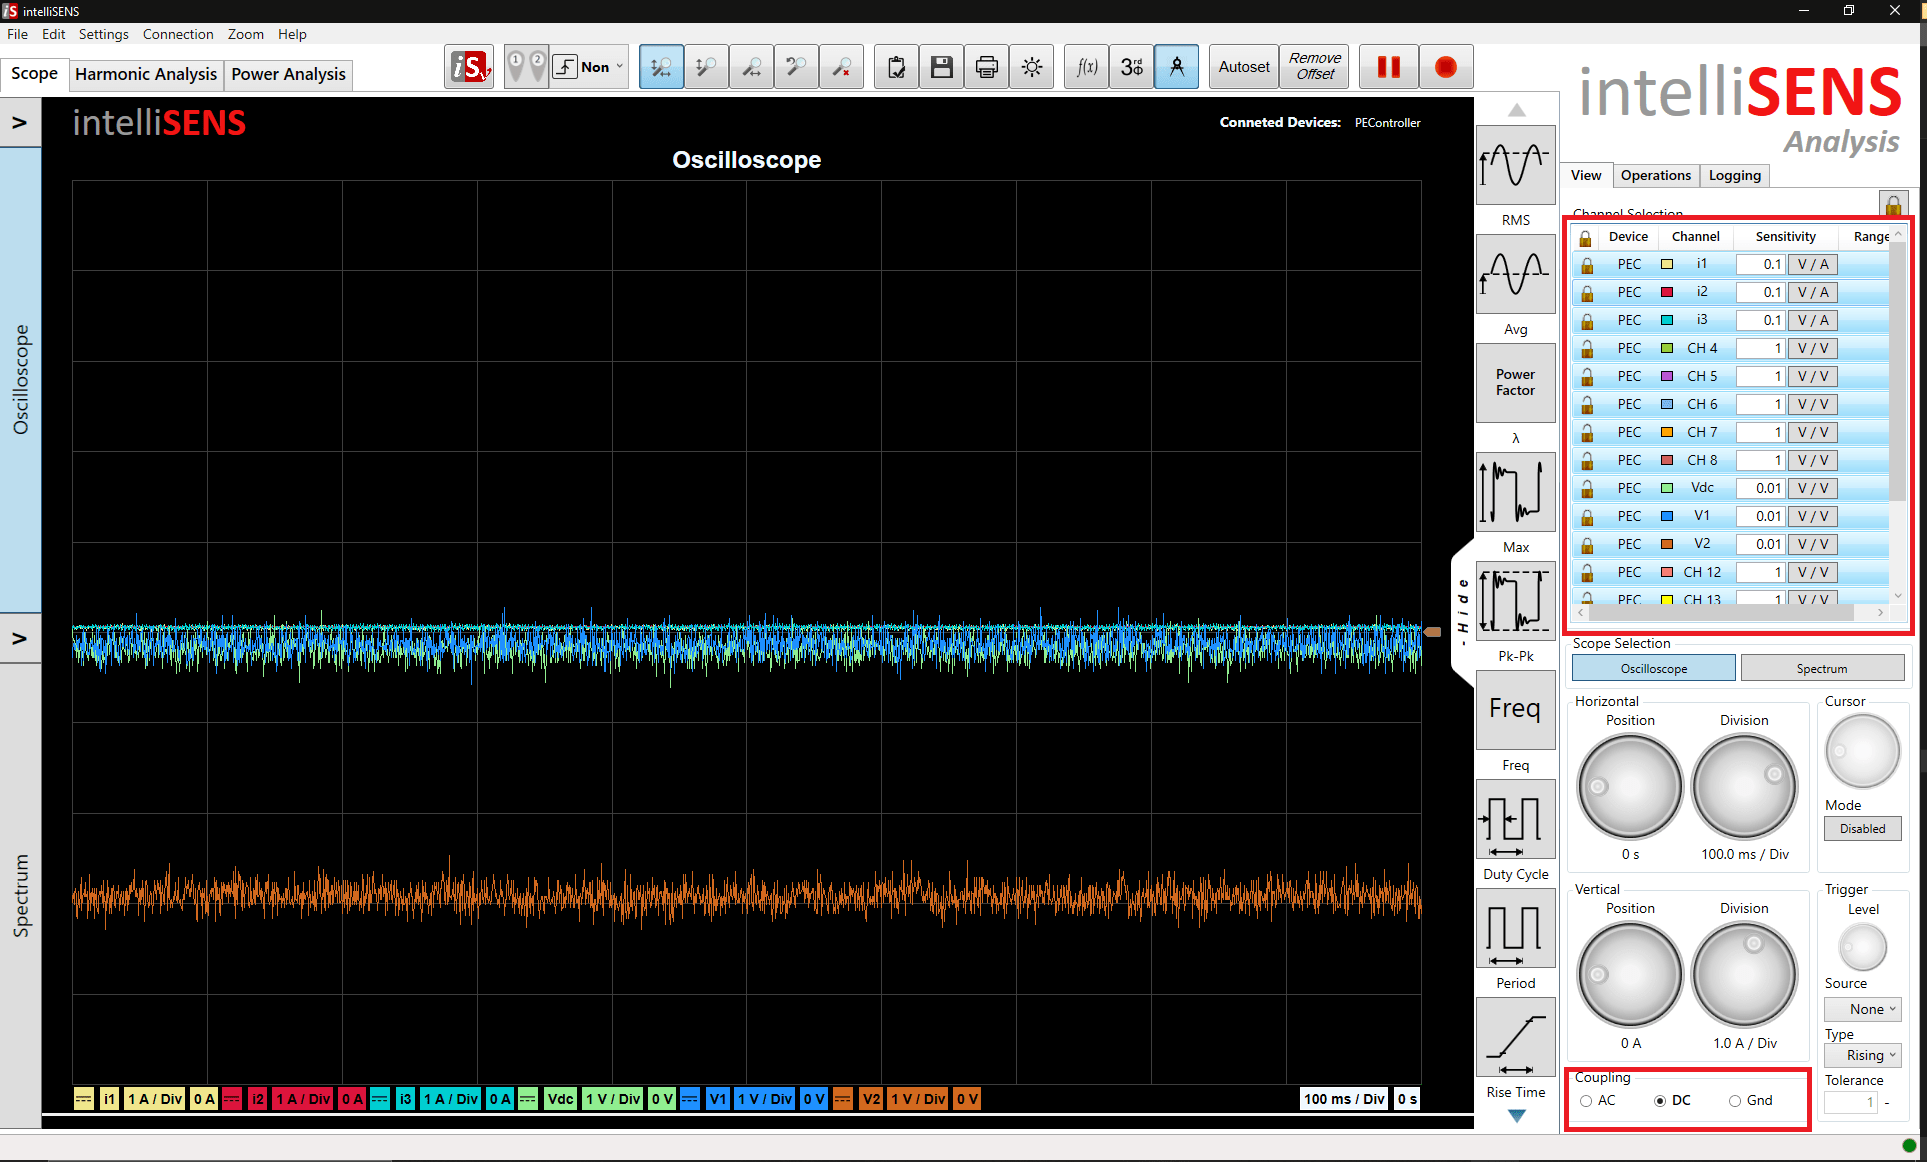
Step 7: Select channels that are similar in characteristics such as the phase currents to link there settings together for better user experience. Press the icon lock icon at top to group these channels.

Step 8: Press the arrow next to Oscilloscope button on the left to disable irrelevant channel’s display.

Step 9: Common measurements can be be added to the display section for each channel. Select the channel in the right panel and insert relevant measurement by clicking it.

Step 10: Press Autoset to better visualize the signals. The grouped channels will be displayed together for better user experience.

Step 11: Use the Operations tab to add mathematical operations to the display.

Step 12: Use the Logging tab to record/log live data for processing and sharing. To log enable the required channels in the logging tab and select appropriate time and location settings. In order to export the recorded data for intelliSENS software enable logging in “.is” format. After configuring the logging press the logging button to start logging for allocated amount of time.

Step 13: Go to the Harmonic Analysis tab. Select a suitable channel and press Compute to get the harmonic analysis results with the specified window type.

Step 14: Open the Power Analysis tab for the power quality analysis. Select the appropriate configuration and channel numbers and press Compute.

intelliSENS Viewer #
intelliSENS Viewer is used for monitoring and processing of recorded files from intelliSENS Analysis. It can be used to perform all functionality provided in intelliSENS Analysis on recorded data.
Step 1: Open the recorded file by double clicking it in windows explorer.
Step 2: After the file opens, it starts to play. Recorded data can be viewed in the Scope tab.

Step 3: After adjusting the coupling for all channels and grouping relevant channels, press Autoset to automatically adjust the display area to optimal setting. Grouping and coupling can be done the same way as described in intelliSENS Analysis section.

Step 4: Add measurements if required.

Step 5: Move the recording to any section using the top navigation pane. The recording can be played in both reverse and forward direction in different speeds via the navigation pane.

Step 6: Harmonic and Power Analysis can also be carried out for the recorded waveform with the same details as obtained in intelliSENS Analysis